EESI Tree Generation Tutorial Pipeline
Below is an overall picture of the EESI Tree Generation Tutorial Pipeline. Each part of the pipleline is labeled. For information about each part of the label, see the descriptions below.
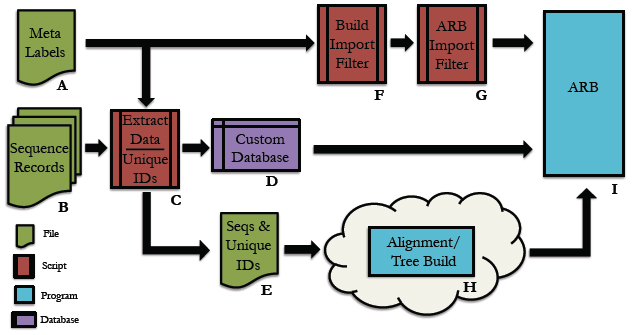
Pipeline Depiction
A
This is a user supplied text file containing all of the names of the meta-data fields. For each entry in the database, all meta-data will be assigned to its respective name and accessible via this name within the ARB environment.
*Note: The order of meta-data names in this file must match the order of the meta-data fields in the custom database. There should be only one meta-data label per line in this text file.
See example: metaLabels.txt
B
Sequence record(s) from which to extract the desired sequence and meta-data information.
See example: GenBank File
C
Python code that extracts information from genbank files. Extensive information can be found in the Data Extraction page.
See example: Data Extraction Python File
D
This is the fasta formatted custom database. Each entry consists of a tab-delimited header followed by a sequence on the next line. To be consistent with the fasta format, the header must start with ‘>’ symbol. A tab is inserted after the carat symbol, which is then followed by the unique id. All meta-data is then filled in, tab-delimited and ordered according to the order of meta-data names provided in the text file described in section A. There must be a tab inserted between the unique id and the start of the first meta-data entry.
See example: customDatabase
E
This is the sequence file for alignment and phylogenetic tree building using any external algorithms and computing resources of choice. It is a fasta-formatted file containing only the unique id in the header. There should be no tabs in the header.
See example: sequences.fasta
F
This is a python script for creating the import filter for your custom database. The metaLabels.txt file described in part A is all that is required by the script to build the filter. The script will output a file called custom_import_filter.ift, which should then be placed in the ARB import filter directory: /arb/lib/import/ See buildFilter.py, custom_import_filter.ift
G
This is the custom .ift ARB import filter for your database, which is automatically generated by the python script described in part F. The filter must be placed into the ARB import filter directory ‘/arb/lib/import/’. To import your database you simply follow the typical ARB procedure for creating a new database (shown below). Information on the ARB syntax for the filter may be found here and here.
See custom_import_filter.ift
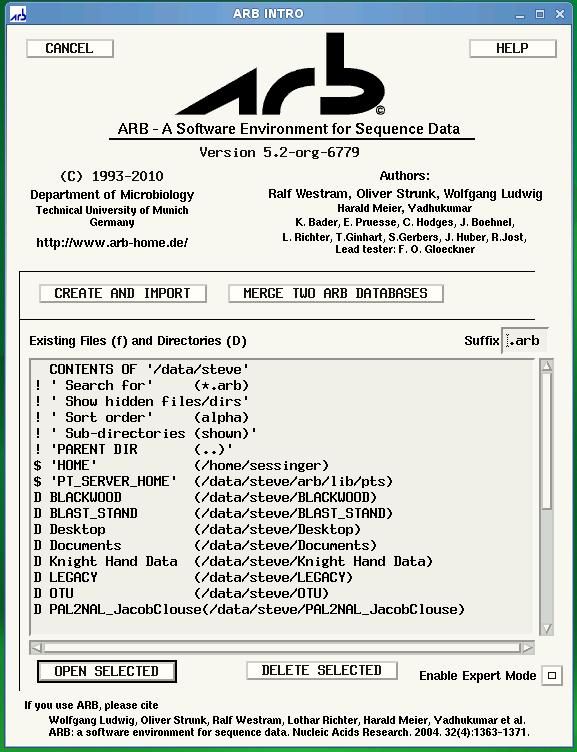
ARB Startup Screen: Choose ‘CREATE AND IMPORT’ to import your custom database.
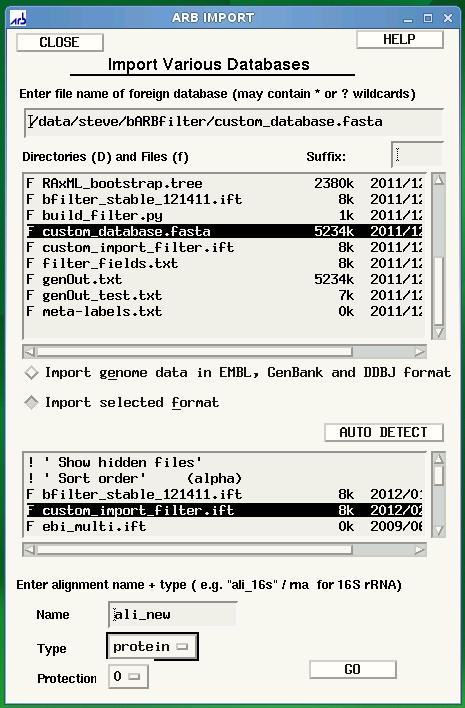
ARB Import screen is displayed after clicking ‘CREATE AND IMPORT’ shown in previous figure. Select the name of your database under directories and files, then select your custom filter, custom_import_filter.ift. Finally, click GO to begin the import.
H
The choice of tool for alignment and phylogenetic tree building is at the discretion of the user. For example, you may be interested in building your tree using the maximum likelihood algorithm offered by RAxML, but desire to use external resources due to inadequate internal computational capabilities. The Cipres Science Gateway offers a potential solution for both sequence alignment (e.g. MAFFT) and tree building (e.g. RAxML) using the TeraGrid computing cluster. The user would submit the sequences.fasta file from part E to Cipres and then build a pipeline within Cipres to construct the tree. The tree output from this process would then by imported into ARB using the tree import function found under ‘Tree/Tree Admin/Import’ within the ARB environment.
*Note: The tree file must have the .tree extension in order for ARB to recognize the tree. An example tree file can be found here
Cipres Science Portal: http://www.phylo.org/sub_sections/portal
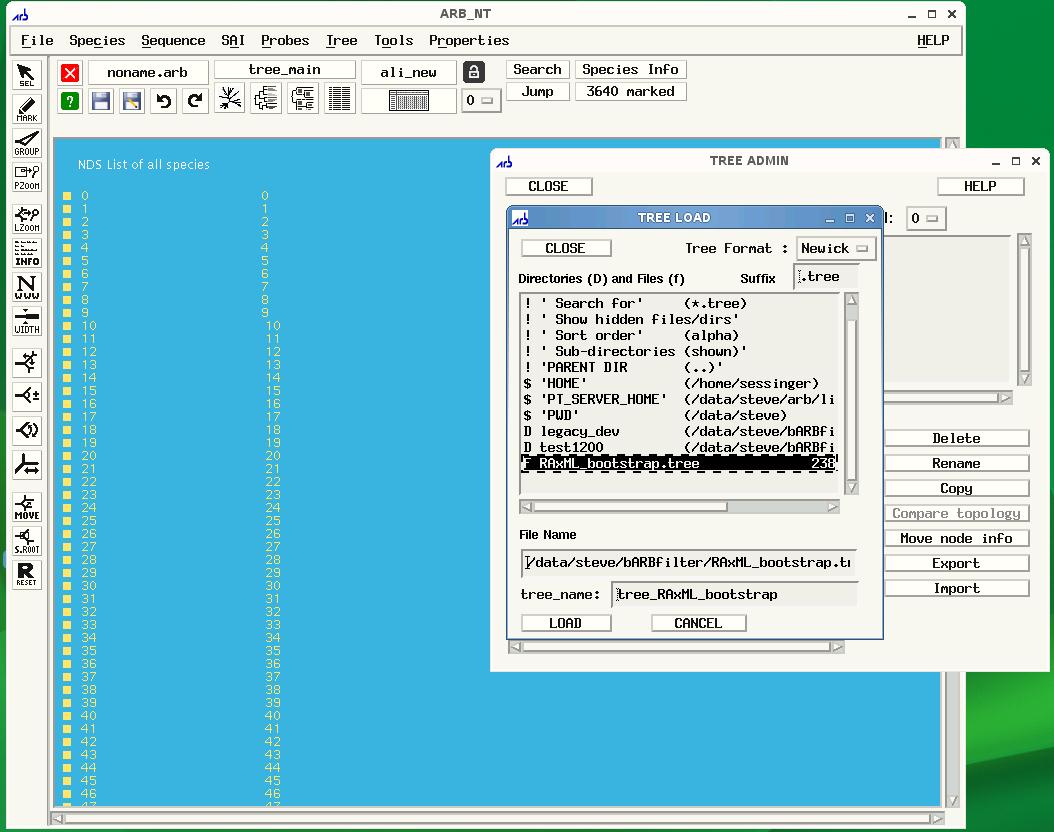
To import your tree, click Tree on the ARB menu, then Tree Admin to open the Tree Admin box and finally, import to open the Tree Load box. Make sure your tree has the .tree extension so that ARB will recognize your file.
I
This is the ARB program. Information on downloading, installation and use may be found at the ARB website: http://www.arb-home.de
EESI ARB Tutorial: Information Extraction from Genbank File
The purpose of this portion of the tutorial is to cover how to extract information from a genbank file using Biopython*. It should be noted that this is a generalized tutorial and is not meant to cover all aspects of Biopython. Additionally, there is more than one way to perform the actions described in this tutorial. It is up to the user to decide which approach works best for their application and for themselves. In-depth information can be found at Biopython.org which contains installation information and a tutorial (http://biopython.org/DIST/docs/tutorial/Tutorial.htm).
*Italicized and bolded text represents code
We will be using a genbank file for a sugar transporter (Zymomonas mobilis subsp. mobilis NCIMB 11163) which can be downloaded here or from NCBI. For information about the type of data held in a genbank file, look here.
A better definition can certainly be found on the biopython.org website, but in short, byopython makes an object out of a genbank file. This object has certain characteristics (attributes, features, keys) which contains the information we would like to extract. Biopython has developed a ready-made interface called SeqIO which will allow us to parse through this object (more information available at http://biopython.org/wiki/SeqIO).
One of the first things we need to do is to create the object parser. This parser can be used with several file formats (e.g. fasta, genbank) and must be told which file type is going to be parsed. Since we are working with genbank files, we use the following:
from Bio import SeqIO
record = SeqIO.read(file, ‘genbank’)
Now that we have created a record, let’s take a look at the top and bottom portions of our file.
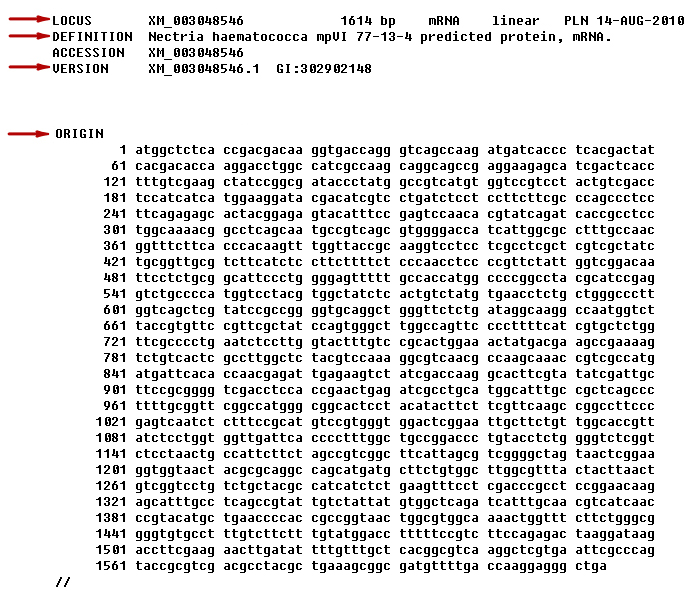
The red arrows point to what we will call the record attributes (‘LOCUS’, ‘DEFINITION’, ‘VERSION’, and ‘ORIGIN’). Accessing anything in a genbank file can be somewhat vexing, especially in the beginning. The first thing is to try and get a listing of what types of elements exist in this record. You can do this by doing the following:
print dir(record)
You will end up with a print out that looks similar to this:
[‘__add__’, ‘__class__’, ‘__contains__’, ‘__delattr__’, ‘__dict__’, ‘__doc__’, ‘__format__’, ‘__getattribute__’, ‘__getitem__’, ‘__hash__’, ‘__init__’, ‘__iter__’, ‘__len__’, ‘__module__’, ‘__new__’, ‘__nonzero__’, ‘__radd__’, ‘__reduce__’, ‘__reduce_ex__’, ‘__repr__’, ‘__setattr__’, ‘__sizeof__’, ‘__str__’, ‘__subclasshook__’, ‘__weakref__’, ‘_per_letter_annotations’, ‘_seq’, ‘_set_per_letter_annotations’, ‘_set_seq’, ‘annotations’, ‘dbxrefs’, ‘description’, ‘features’, ‘format’, ‘id’, ‘letter_annotations’, ‘lower’, ‘name’, ‘reverse_complement’, ‘seq’, ‘upper’]
All of the information is important, but only some of the items are of direct use to us, specifically ‘annotations’, ‘dbxrefs’, ‘description’, ‘features’, ‘id’, ‘name’, and ‘seq’. Note that print dir(record) will not give you the values associated with these attributes, but the name of the attribute (‘annotations’, ‘dbxrefs’, ‘description’, ‘features’, ‘id’, ‘name’, and ‘seq’, etc…). You can access the value of that attribute by using record.attribute_name or more specifically:
locus = record.name
definition = record.description
version = record.id
seq = record.seq (this is the sequence seen beneath the word ‘ORIGIN’)
We can also determine the length of the sequence (top middle portion of previous image) by taking the length of the record: len(record) = 1614.
One of the items in the list above is the ‘annotations’ field. If we want to find out what is contained in the annotations field, we can type:
print dir(record.annotations)
You will end up with a print out that looks similar to this:
[‘__class__’, ‘__cmp__’, ‘__contains__’, ‘__delattr__’, ‘__delitem__’, ‘__doc__’, ‘__eq__’, ‘__format__’, ‘__ge__’, ‘__getattribute__’, ‘__getitem__’, ‘__gt__’, ‘__hash__’, ‘__init__’, ‘__iter__’, ‘__le__’, ‘__len__’, ‘__lt__’, ‘__ne__’, ‘__new__’, ‘__reduce__’, ‘__reduce_ex__’, ‘__repr__’, ‘__setattr__’, ‘__setitem__’, ‘__sizeof__’, ‘__str__’, ‘__subclasshook__’, ‘clear’, ‘copy’, ‘fromkeys’, ‘get’, ‘has_key’, ‘items’, ‘iteritems’, ‘iterkeys’, ‘itervalues’, ‘keys’, ‘pop’, ‘popitem’, ‘setdefault’, ‘update’, ‘values’]
That is kind of messy and it is hard to tell where the information we want is stored. A clue is words that are not associated with ‘_’. The other way to figure it out is good old fashioned tinkering. A couple of items looked promising – ‘keys’ and ‘values’. Typing print record.annotations.keys() would will yield the following list:
[‘comment’, ‘sequence_version’, ‘source’, ‘taxonomy’, ‘keywords’, ‘references’, ‘accessions’, ‘data_file_division’, ‘date’, ‘organism’, ‘gi’]
Now take a look at the top half of the file, we see several other items in addition to the attributes (seq not inluded).
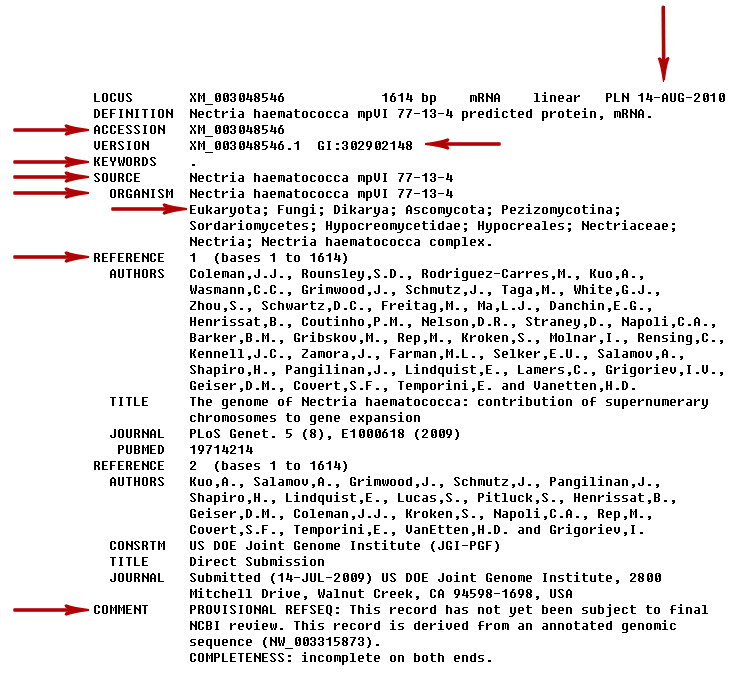
We are interested in the items indicated by the red arrows. We will (cleverly) call these the annotations. Looking at the list we just created, we can see similar names in the image such as: ‘ACCESSION’, ‘GI’, ‘DBSOURCE’, ‘KEYWORDS’, ‘SOURCE’, ‘ORGANISM’, ‘REFERENCE’ and ‘COMMENT’. The date (seen on the top right side of the image (vertical arrow) and the taxonomy (seen below ‘ORGANISM’; the line starts with ‘Eukaryota’) can also be assessed via the record’s annotations. To get the value of the fields we could type print record.annotations.values() which would get us the following:
[‘PROVISIONAL REFSEQ: This record has not yet been subject to final\nNCBI review. This record is derived from an annotated genomic\nsequence (NW_003315873).\nCOMPLETENESS: incomplete on both ends.’, 1, ‘Nectria haematococca mpVI 77-13-4’, [‘Eukaryota’, ‘Fungi’, ‘Dikarya’, ‘Ascomycota’, ‘Pezizomycotina’, ‘Sordariomycetes’, ‘Hypocreomycetidae’, ‘Hypocreales’, ‘Nectriaceae’, ‘Nectria’, ‘Nectria haematococca complex’], [”], [Reference(title=’The genome of Nectria haematococca: contribution of supernumerary chromosomes to gene expansion’, …), Reference(title=’Direct Submission’, …)], [‘XM_003048546’], ‘PLN’, ’14-AUG-2010′, ‘Nectria haematococca mpVI 77-13-4’, ‘302902148’]
EUREKA!
Looping comes in really handy when it comes to assigning these annotations to variables, we just need to know the name of the annotation key.
for key in record.annotations.keys():
if key == ‘date’:
date = record.annotations[‘date’]
…
if key == ‘comment’:
metaData[‘comments’] = record.annotations[‘comment’]
You may have noticed that in this example, ORGANISM and SOURCE have the same value. However it should be understood that these are different fields that have the same value (the same is true of the LOCUS and ACCESSION fields.). Genbank files are a mixed lot and these values will not always be similar. Also, some of these fields will not always exist and some may be empty. Some files will not have any REFERENCE fields, others may contain multiple REFERENCE fields. In this example, we have two; each containing AUTHORS, TITLE, JOURNAL fields (note that only the first REFERENCE has a PUBMED entry). If we are only interested the information associated with the first REFERENCE we would do the following:
for key in record.annotations.keys():
if key == ‘references’:
for ref in dir(record.annotations[‘references’][0]):
if ref == ‘authors’:
authors = record.annotations[‘references’][0].authors
if ref == ‘title’:
title = record.annotations[‘references’][0].title
if ref == ‘journal’:
journal = record.annotations[‘references’][0].journal
if ref == ‘pubmed_id’:
pubmed = record.annotations[‘references’][0].pubmed_id
If we were interested in the second set of REFERENCE information, we would replace the ‘0’ with ‘1’. If we were interested in the third set of REFERENCE information, we would replace the ‘0’ with ‘2’. Pay attention to the indices; in coding languages (e.g. Python), the first entry of a list is ‘0’.
Looking at the bottom of the file (ORIGIN not included), we see items ‘source’, ‘gene’, and ‘CDS’ under FEATURES.
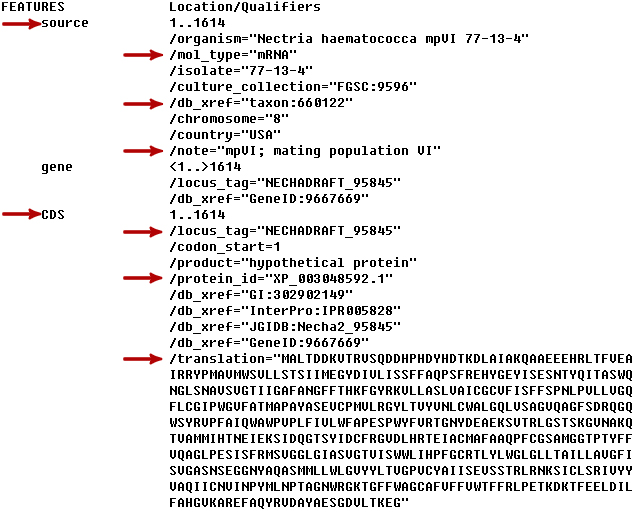
The name indicates what these items are – FEATURES, specifically different types of FEATUREs. Each FEATURE type (e.g. source) is contained in a FEATURE list. Getting to the information stored under each type is similar to above but involves a bit more work. Each item in the FEATURE type list (‘source’, ‘CDS’) contains it’s own nested list called qualifiers. As mentioned previously, some fields will exist in one file and not in others. Nowhere is the more true than in the sublists of the features. This time print dir(record.features) does not yield anything useful. We can try print record.features which will get us the following:
[SeqFeature(FeatureLocation(ExactPosition(0),ExactPosition(1614)), type=’source’, strand=1), SeqFeature(FeatureLocation(BeforePosition(0),AfterPosition(1614)), type=’gene’, strand=1), SeqFeature(FeatreLocation(ExactPosition(0),ExactPosition(1614)), type=’CDS’, strand=1)]
We can see that this information may be useful, but we need to delve into it a bit more. The key to solving this puzzle is to recognize that since a FEATURE is a list, the types (‘source’, ‘gene’, ‘CDS’) are specific indicies of the FEATURE list. If we want the infomation under ‘source’ we would do print record.features[0] which would give us:
type: source
location: [0:1614]
strand: 1
qualifiers:
Key: chromosome, Value: [‘8’]
Key: country, Value: [‘USA’]
Key: culture_collection, Value: [‘FGSC:9596’]
Key: db_xref, Value: [‘taxon:660122′]
Key: isolate, Value: [’77-13-4’]
Key: mol_type, Value: [‘mRNA’]
Key: note, Value: [‘mpVI; mating population VI’]
Key: organism, Value: [‘Nectria haematococca mpVI 77-13-4’]
We have printed it out, but how do we assign a sublist item to a variable? Assuming we are interested in the ‘mol_type’ found in the ‘source’ FEATURE type, the first thing we do is loop through the FEATURE list until we land on ‘source’. To aid in this endeavor, we need to keep track of where we are so we will create a variable and initialize it to zero. Each time we loop through the list, we will augment this variable by one. It looks something like this…
featureCount = 0
for feat in record.features:
if feat.type == ‘source’:
source = record.features[featureCount] #local variable to hold position
for qualifiers in source.qualifiers: #iterate through the source list
if qualifiers == ‘mol_type’:
mol_type = source.qualifiers[‘mol_type’]
if feat.type == ‘gene’:
gene = record.features[featureCount] #local variable to hold position
…
featureCount = featureCount + 1
Now you have the basic approach to extract information from your genbank files. Provided you know what you are looking for, you can adjust the code to extract the required information. Please note that because this information will be imported into ARB, your variables cannot have any spaces. Several variables will have words, brackets, quotes, spaces, tabs, and newline characters that you may (or must) be removed. You can remove the unwanted characters by several means, but here is a standard approach.
variable = re.sub(r'[^\w ]’, ”, variable) #removes all non-alphanumeric characters
variable = variable.replace(‘ ‘, ‘_’) #replaces space with underscore
variable = variable.replace(‘\n’, ”) #replaces newline with nothing
variable = variable.strip( ‘ \t\n ‘ ) #removes leading/trailing whitespace (tab, newline)
variable = variable.replace(‘superfluous:’,”) #removes the word ‘superfluous:’ from the string
Be certain to initialize every variable with ‘NA’. That way even if an item does not exist in a particular genbank file, it will never be unassigned. Unassigned variables (i.e. blank/empty values) will cause serious problems when imported into ARB.
Special thanks to Thomas E. Keller of the Wilke Lab for taking the time to answer some Biopython questions for me.